About Me

My photo
San Diego, CA
Self-taught baking goddess takes on the world, armed only with her kitchen-aid mixer.

Tuesday, July 19, 2011

Kerri cakes

Thesis countdown: 8 days. Yes, you could say that I'm freaking out. And I go out of town tomorrow. Who's genius idea was that? But I've been a whirlwind of productivity over the last week. On all fronts, both thesis and non-thesis alike.

Unfortunately, my motivations for keeping busy are beyond the usual "I don't want to do my homework..." woes. Last week, one of my mentors passed away unexpectedly. Her teaching career has been going strong longer than I have been alive, and she will be missed by so many. She was a phenomenal woman who, alongside my other mentor, has guided me through my early years of advising. She is someone that I often tell my students I aspire to be like someday, when I am a grown up. You can read more about her here. My eyes well up with tears every time I think about having to share this news with my students, who idolized her...

Her best friend (for over 50 years!) is my other journalism mentor (you can read about us here) and my heart is aching for the loss she is dealing with. Hearing the pain in her voice when I talked to her earlier this week brought me to my knees. I cannot imagine not being able to wake up and call my best friend tomorrow morning. I love these women like my family, so, in a sense, I feel like I've lost one of my own family members... And really, these women, JEA and my yearbook and newspaper kids ARE my family.

And what do I do when I can't deal? I bake! And what makes everyone happy? Cupcakes! Itty bitty ones!

These cupcakes are special to me because I named them after one of my best friends--she's vegan, and I wanted to make her something delicious for her birthday and this cupcake was born... She's one of the people I'd be lost without. Who would go on runs with me? Who would let me borrow their dog three days a week? Who would make fun of my "sort of" skirts and my tie dye obsession?

Kerri Cakes
(vegan chocolate cupcakes)
photo by Jessica Y.
Their vegan-ness does NOT detract from the deliciousness. 
Even the pickiest eaters will devour these! 
(Garnished with a dark chocolate covered almond.)
3 Cups flour
2 Cups sugar
6 Tablespoons cocoa powder (Dutch Process)
2 Teaspoons baking soda
1 Teaspoon salt
3/4 Cup vegetable oil
2 Tablespoons vinegar
2 Teaspoons almond extract (vanilla works, too)
2 Cups strong coffee (plus extra for brushing)

1. Preheat your oven to 350. Line your cupcake tin with the most adorable liners you can find.

2. Sift together all dry ingredients.

3. Add each liquid ingredient, stirring well after each addition. This is especially exciting, because of the magic that the baking soda and vinegar make!

4. Fill cupcake liners 3/4 full. Bake in oven for 9-11 minutes for mini cakes and 18-20 minutes for regular cupcakes.

5. Once the cupcakes come out of the oven, prick the tops 2-3 times with a toothpick. Brush the tops with the remaining coffee. Allow to cool before frosting.

Vegan Frosting
Chocolate Mocha Flavor
photo by Jessica Y.
A wire whisk and an electric mixer make frosting a breeze! 
Trust me, I had four years of doing this by hand.
 
1 Cup sugar
6 Tablespoons cornstarch
4 Tablespoons cocoa
1/2 Teaspoon salt
1 Cup strong coffee
2 Tablespoons oil
1/2 Teaspoon vanilla 
 
1. Mix sugar, cornstarch, salt and cocoa in saucepan on medium heat. Whisk in coffee.
 
2. Heat until boiling and mixture begins to thicken (1-2 minutes). 
 
3. Remove from heat and stir in oil and vanilla.
 
4. Allow to cool. Whisk before using. 


Thursday, July 14, 2011

Summer Fruit Cobbler

Two days ago, I was packing all my "grown up" clothes, toiletries and shower shoes into my bright pink suitcase, preparing to embark on a cross-country journey that would have me preventing a bunch of rowdy high school kids from unleashing their havoc on Yale University. This stressed me out for a number of reasons. First and foremost, I was worried that my house would not get cleaned or looked after while I was gone and would subsequently be overrun by ants. Second was that I was also seriously concerned that my boyfriend would exist solely on energy drinks and hot pockets in my absence. And finally, I had mounds and mounds of guilt welling up inside of me about the copious amounts of fruit (and the decent chunk of change that I spent on it) that was going to go bad in my fridge while I was gone. I am not kidding when I say I lost sleep over this final quandary. There was also this pesky business about a thesis I have to have finished in less than three weeks, but I mean... really? Minor detail.

BUT!!!

Lady luck has smiled on me (and simultaneously given me the finger). My flight out of San Diego was cancelled and the airlines are so inept at their own job that they couldn't get me across the country in time for me to do the job I was supposed to do... So I ended up keeping my feet on the ground and scoring five more days of summer that I hadn't planned on. The only drawback? I don't get to spend those five days with my friend I would have been working with... But I'll see her when I work a similar conference at UCLA next week... which will involve cupcakes (but that's another post entirely).

So, I get to stay in San Diego. I get time do things. Like my nails. And clean out my email inbox. And organize my towels. And buy a REALLY awesome hammock. But the best part? I get to put that fruit to use! And you get to read about it, in all of its delicious glory...

Summer Berry Cobbler
photo by Jessica Y.
A summer concoction of berries makes for happy melody in your mouth.

5-6 Cups of assorted fruits (I used 4 cups of sliced strawberries, 1 cup of peaches and 1 cup raspberries & blueberries... I used all fresh fruit, but frozen would work as well... Just let them thaw first and drain the run off, otherwise you're going to have a very soupy cobbler on your hands.)
2 Tablespoons white sugar
3/4 Cup whole wheat flour
3/4 Cup rolled oats
1/2 Cup firmly packed brown sugar
1/2 Cup butter
1 teaspoon cinnamon
1/2 teaspoon nutmeg
2 Tablespoons Milk

1. Preheat your oven to 350. While that baby is heating up,  slice all of your fruit into bite-sized pieces. Place in a large bowl and add the sugar. Stir to coat all of the berries. 

2. In another bowl, mix together all the other ingredients. Add the milk last, and if you don't need a full two tablespoons, don't use it all. The ingredients should mix to form a crumbly, chunky dough.

3. Spray an 8x8 baking pan (or similar sized baking dish) with cooking spray. Press half of the dough mixture into the bottom of the pan. It doesn't have to be perfect, but cover most of the bottom of the pan.

4. Spoon the berry mixture on top of the crust you just pressed into the pan.

5. Crumble the rest of the dough mixture over the top of the berries. Sprinkle with sugar (if you want).

6. Place in the oven on a middle rack. If your pan is almost filled to the top with goodness, you may want to place it on a cookie sheet so that if it bubbles over while it bakes you don't end up cleaning your oven for the next three days. Bake for 35-45 minutes, or until the fruit is bubbling around the edges.

7. Let cool for 10 minutes (if you can wait that long) and top with a healthy scoop of vanilla ice cream. We actually ate ours with vanilla bean gelato... Amazing.

photo by Jessica Y.
Melting ice cream + sweet fruity goodness + green polka dots = winning!


Sunday, July 10, 2011

Oreo Rice Crispy Treats

I fear that I would fail on one of those competitive cooking shows simply because my plating skills suck. I can make things taste all kinds of delicious, but they are not always so pretty.

Case in point? I made quite possibly the most delicious and addicting rice crispy treats known to man (and woman, and dog) this weekend. I had many motivations for setting out on this baking endeavor...

A) Oreos + Rice Crispies = winning! They sounded liked something that my boyfriend would add to the list of "things to bake to get yourself out of trouble for scheduling too many activities for me to participate in//putting too many things on the 'to do' list for the weekend"...

B) I had my student editors over for a planning meeting and BBQ, and you really can't go wrong with chocolate, cookies and high school kids.

C) While there was some stove-top heat involved, this did not require my oven. And it was just too.damn.hot. to really "cook" anything this past week.

So, I'd been planning to make these for a few days. I had my little shopping list all set up on my phone, and I dutifully ticked items off as I pulled them off the shelves... evaporated milk? check! mini marshmallows? check! chocolate chips? who are we kidding? I bought an extra bag, just to be safe. Now, what did I realize that I forgot to buy when I got home (at 10 PM, mind you...)? Freaking Rice Crispies! So, back to the store I went, kicking myself the whole way there... But let me tell you, they were sooooooooo worth it.

I guinea pigged these on a wide audience, and they were met with rave reviews across the board. Boyfriend + his friends: loved them, even before they cooled and set. Newspaper kiddos? They devoured them. My coworkers at the gym: A+ from them (and yes, I was a little torn about taking baked goods into the gym... but those things were too addicted to leave in the house!).

The only drawback? They're kind of ugly. They just aren't all that nice to look at. I know that the way they taste is really what matters (just like how it's 'what's on the inside' that really matters with people...), but part of me can't get past the fact that these treats got their ass kicked by the ugly stick. But they do have a winning personality going for them.


Oreo Rice Crispy Treats with Chocolatey Drizzle
adapted from Baking Serendipity

 photo by Jessica Y.
They may not be the best looking dessert on the block, 
but you won't be able to stop eating them.

1/4 cup butter (half a stick)
4 cups mini marshmallows (or about 40 normal sized mallows)
6 cups Rice Krispies cereal (in the future, I want to try this recipe with Cocoa Pebbles)
2.5 cups  Double Stuffed Oreo cookies, quartered (This is about 2/3 of a package of Oreos)

1.Quarter Oreos and combine with Rice Krispies in a large mixing bowl. Set aside.

2. In a skillet with high sides, brown butter. This is not as hard as it sounds. Seriously, just put it on medium heat and stir it slowly until the butter gets to be a golden-brown color.

3. Add in marshmallows and stir to melt marshmallows and distribute brown butter evenly throughout.

4. Pour marshmallow/brown butter mixture over Oreos/cereal and stir gently, just to coat. A wooden spoon works nicely for this.

5. Press into a 9x13" pan coated with cooking spray and let sit to firm up before topping with ganache.

Chocolatey Drizzle

1/4 cup evaporated milk
1/2 cup chocolate chips
1/4 cup white chocolate chips

1. Bring evaporated milk to a boil in a small saucepan.

2. Add chocolate chips slowly, stirring to melt, but not burn.

3. When chocolate has melted and chocolately drizzle is thickened, drizzle over Rice Krispies. A whisk works nicely for this. Let set to firm up before covering or serving. 

Thursday, July 7, 2011

Cheesecake Brownies

6. Cooking stores are like my pornography. I was at the mall yesterday, in a generally grumpy disposition because I had to deal with the madness of the Apple store, but walking through the baking sections of a few kitchen stores sent me to cloud nine. It made me tingly all over. BUT!!! that's not as dirty as it sounds. Get your mind out of the gutter.

7. I'm prejudiced. Or maybe racist? I'm not sure what to call it. Before you start sending me white hoods and hate mail, let me explain. I just don't like cake. I find it obnoxious. It's all big, and calorie-loaded and is just getting quite arrogant with all of it's topsy-turvy-ness and all that other BS you see on the food network challenge shows. BUT!!! I like cupcakes. I like cupcakes a lot. They are little. And cute. And your pants still fit if you eat one. And if you botch the decoration on one, you still have 11 more to make beautiful. You cannot say the same thing about cake. I guess that makes me cake-cist. I guess it's a little like loving puppies but not really having a tolerance for dogs. Does that make me a bad person?

8. Baking is the key to my happiness. Over the past few years, as my love for cooking has developed, I've done some reflection and soul searching to figure out just what it is about the kitchen that I love so much. At first, my inner fat kid was like, "Duh, you love food." But the truth is, I don't really eat a lot of what I bake. I revel in feeding other people. I love the look on someone's face when they are eating something they enjoy that I made. This is why I force feed my boyfriend. This is why I, especially, enjoy feeding my students. Nothing makes high school kids happier than baked goods. Yes, it costs me some money. Yes, it costs me some time. Yes, it makes me weirdly popular with some interesting people. BUT!!! I wouldn't trade this obsession for anything.

9. I don't have an "OFF" switch. My mind never shuts down. Sure, I sleep. And there are days when I accomplish little to nothing of note. But I can never fully stop processing, analyzing and reflecting on what is going on around me. Whether it's giving strangers wardrobe makeovers in my head while I run on the beach, restructuring an assignment for my students while I fold laundry or crafting a cupcake recipe while I shower, my brain is never at rest. This drives my boyfriend insane. I typically run at 100% until my body just shuts down and says, "Enough!" This always happens over break--so that I get the pleasure of spending my time off sick, in bed. Thinking of new things to bake, of course. BUT!!! I always come back from those breaks so ready, so excited and so full of ideas. I suppose that means it's necessary re-charge time.

10. I am the WORST procrastinator EVER. My thesis is due in 19 days. What am I doing? Writing blog posts, cleaning my office, vacuuming, reorganizing my baking supplies, doing laundry, painting my toe nails, trying (and failing) to fix the sprinkler along the driveway that I ran over, playing with the dog, and, of course, baking. This is all bad news for me, as my deadline approaches. BUT!!! It's great news for you... Because that means more recipes! For these goodies, I really wanted to do something special for my boyfriend, who has been working two jobs and then coming home to a "Honey Do" list a mile long and dealing with baking-obsessed and super stressed out me. He deserved a treat, so my attempts at avoiding what I needed to do resulted in something yummy for him (and you).

Nick's Chocolate Chip Cheesecake Brownies

photo by Jessica Y.
These blonde brownies combine some of Nick's favorite things.

For the blonde brownie:
1 cup butter flavored Crisco
1 cup firmly packed brown sugar
1/2 cup white sugar
1 teaspoon Kahlua
1 teaspoon vanilla extract
3 eggs
2 cups all-purpose flour
1 teaspoon baking soda
1/2 teaspoon salt
1 cup chocolate chips
1 cup white chocolate chips

For the cheesecake "filling":
2 (8 ounce) packages cream cheese
1/4 cup white sugar
2 eggs
1 teaspoon Kahlua
1 cup chopped pecans (optional)
  1. Preheat the oven to 350 degrees F . Grease a 9x13 inch pan. I used a "Perfect Brownie" pan that makes all edge pieces--divine!
  2. In a large bowl, cream together shortening, brown sugar, and 1/2 cup white sugar. Beat in the 3 eggs one at a time, then stir in the vanilla and Kahlua. 
  3. In a separate bowl, combine the flour, baking soda, and salt; sift into the sugar mixture. Stir in chocolate chips, and set aside.
  4. In a separate bowl, mix together the cream cheese and 1/4 cup white sugar. Mix in the 2 remaining eggs.
  5. Spread 1/2 of chocolate chip dough in bottom of the prepared pan. Place in pre-heated oven for 5 minutes. Remove from oven.
  6. Pour cream cheese batter on top of dough. Sprinkle with pecans (if you are using them). 
  7. Spoon dollops of the remaining blonde brownie batter over filling. The batter will spread as it bakes,so it is ok if there are gaps.
  8. Bake for 45 minutes in preheated oven, or until lightly browned on the top. Let the brownies cool in the pan before cutting into bars. 
  9. Serve with a big glass of milk!

Monday, July 4, 2011

Sundried Tomato Hummus

1. I am a tornado in the kitchen. I do not keep a tidy workspace. It looks like a bomb went off. BUT!!! there is a method to my madness.

2. I like to cook in my bathing suit. This is a recent development and I attribute it to the scorching temperatures that have been plaguing my life lately. BUT!!! if you haven't tried it, I highly recommend it. Just not when there is grease or splashback threats involved.

3. You can never have too many spatulas. I was beginning to question my collection, thinking it a bit obsessive. BUT!!! let me tell you, there is always more room in your life (and kitchen drawers) for spatulas. I am actually now considering expanding my collection.

4. I've come to look at my kitchen appliances like children. And I totally play favorites. Today, I am in love with my magic bullet and food processor. Enamored with them, really. They get the gold stars for the day. BUT!!! that doesn't mean I don't still love my Jolly Green Giant. He is green, after all.

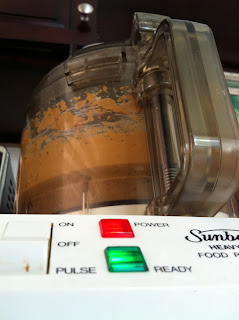
5. My food processor is probably older than I am. My dad passed it down to me and I'm thinking it may have been a wedding present that he and my mom received in the 70s. The pictures on the box and in the owner's manual are quite telling. As is the stylish brown tinge of the mixing bowl and base. BUT!!! that thing works like a charm. It's seen more action in the last month than it has in its entire lifespan, I think.

photo by Jessica Y.
There isn't a thing I don't love about this guy. 
His 70s style is charming.

So, where is all this going? TO HUMMUS, OF COURSE!!! We are off to a 4th of July BBQ and my guest etiquette tells me I cannot show up empty handed. It's too hot for cupcakes (and I'm out of butter) and I have a jar of tahini paste that's been taunting me, begging to be used, for weeks now. This also leads me to confession #6...

6. I am really, really bad at following directions. Ask any of my teachers--I much prefer to do things my own way. If you don't believe me, ask Mr. MacLaughlin about my 25 page report on the state of Russian prisons and the correspondence I started with a felon, in the name of research. I was 14. BUT!!! not following directions (or recipes) usually lands me in a world of something delicious that I can call my own. And now I can share it with you.

The "Don't tell me what to do" Hummus
2 cans garbanzo beans
1/2 c tahini paste
2 T olive oil
1/4 C dried basil
1/4 C fresh basil
1 jar sundried tomatoes
1 T sea salt
1 T balsamic vinegar
1 clove of garlic
1 strip of bacon (yes, if you know me, you know this is not my style... but trust me, ok?)
2 T lemon juice
pepper to taste
1. Drain the beans and dump them in your food processor. Add the olive oil. Blend until smooth.

2. Add the tahini and basil. Pulse until well mixed.

3. Add the tomatoes, vinegar, garlic and lemon juice. Blend until fully combined.

4. Add everything else. Mix well.

5. Use a spatula to scrape the sides of the mixer and along the bottom of the bowl. Blend for about 30 more seconds. 

6. Serve and enjoy!

photo by Jessica Y.
Get your veggies and pita chips ready!

7. I am dying to go on Cupcake Wars or the Next Food Network Star. I watch these shows (more than I should) and I sit there thinking, "I could do that!" Until they do something fancy, or hard, or with a French name. Then I get scared and am knocked back into reality. I also have this unsettling fear that I would a) Choke and make a fool of myself and/or b) be the personality on the show that everyone hates. So I'm keeping it in my kitchen for a while... BUT!!! I may have a project for NEXT summer... :)

Sunday, July 3, 2011

Milk 'n' cookies

For better or for worse, the wonders of modern technology make it so that I can post stuff from anywhere... Including the gym where I work part time. Why I need a part time job on top of teaching is a whole different issue... But let's not get started on that one. Mama's got a mortgage, bottom line.

And speaking of mamas, this entry is for them. Seems like everyone I know these days is popping out kids, and since I am SO not at that place in my life right now, I've compensated by baking for my mama friends.

Most recently, I wanted to do something nice for my boyfriend's sister in law. But, my lack of maternal instinct left me unsure of what to do. The advice of another momma friend was to avoid baking with booze or crack, and I should be fine. She suggested a lactation cookie, which honestly gave me the heebie jeebies at first. But! I did some research, and a few test batches, and I've come up with a recipe that is a total hit--for both those who lactate and those who do not. I can't attest to their effectiveness, but they are supposed to help increase and maintain a healthy milk supply.

So, if you're not totally grossed out yet... Check em out!

Milking Cookies

1.5 c flour
1 tsp salt
1 tsp baking soda
1 tsp cinnamon
3/4 c peanut butter
1/2 c butter
1.5 c oats
1 tsp vanilla
1 tsp almond extract
1 c flax
2 T milk
3 T brewers yeast
2 c chocolate chips
1/3 c water
1/2 c sugar
1/2 c brown sugar
2 eggs

1. Preheat oven To 350.

2. Sift together flour, cinnamon, salt, baking soda.

3. In large bowl, cream butter, sugars and peanut butter.

4. Add eggs, one at a time.

5. Mix in flax. Follow with vanilla and almond extract.

6. Add the flour mixture in thirds. Follow with the milk.

7. Mix in the oats. Follow with the chocolate chips.

8. Roll dough into ping pong sized balls. Flatten with a fork.

9. Bake in preheated oven for 9-11 minutes.


photo by Nick H.
They may not be all that photogenic, but these cookies are a hit
among mommies and daddies alike.

Tie Dye Cupcakes (aka Cheating at Baking)

In the last two weeks, I have had marathon days--seven hours at school, working on curriculum development and off to master's courses in the evening for another three hours. This is adding up to almost 10 hours behind a computer a day. So forgive me if I've been a bit absent on the blog front.

BUT!!!

All of this school and work business means grand things. It means that there is a whole lotta baking going on in this little house. Baking is my therapy. When life gets tough, this cookie gets cooking. The last several days have lead me to a delicious dinner of balsamic glazed chicken, super moist chocolate pomegranate cupcakes, dreamy hummus, a patriotic version of my tie dye cupcakes and, to top it all off, milkin' cookies (made for my someday sister in law). And yes, recipes for all of these things will make it here eventually.

Given the impending Independence Day celebrations, and the BBQs, potlucks and parties that are sure to ensue, I felt that the cupcakes were probably the most important to share. Not to mention that dozens of my friends have asked for the recipe and I've never actually gotten around to actually giving it to them. Plus, the name of this blog is BAKE Me Happy... So I should probably focus on the stuff I bake, right?

 photo by Jessica Y.
These cupcakes are all dressed up for the 4th!

But before I spill the beans, I have a confession to make. My quest for amazing cupcakes has lead me to several cupcake "cookbooks" that are mind boggling... These so-called recipes call for ready-made cake mix, with a few bells and whistles thrown in. If you ask me, that's not baking. That's cheating. Bottom line. Taking cake from a box and adding some dried cherries or a splash of rum is kind of a no-brainer. That's not a recipe. In my opinion.

BUT!!!

I make one exception. And that is tie dye cupcakes. They can be done from scratch, but the ready made box (in this one and ONLY circumstance) is a better route, as it gives you a lot more time for fun, creativity and less margin for error.

Tie Dye Cupcakes

1 box white cake mix
3 egg whites
1 1/3 C. water
2 T vegetable oil
Variety of paste style food coloring

1. Preheat oven to 350 degrees.

2. Line cupcake pan with paper liners.

3. In a large bowl, combine water, oil and cake mix until smooth.

4. Determine how many different colors you would like to make; separate the batter into that many bowls. Three to four colors is what I would recommend. Obviously, I left one bowl plain and did red and blue for my festive cupcakes (pictured above).

4. Add the egg whites.

5. Add the food coloring to the divided bowls of batter. Mix until desired colors are reached. The paste food coloring is recommended for this, as you can achieve bright, rich colors without diluting the batter or getting the taste of the food coloring in the final product.

6. Using table spoons, spoon the different colors of batter into the cupcake liners. You can alternate colors for a stacked rainbow effect, or you can fill the cups with the colors side by side. You can randomly add spoonfuls at a time, or follow a specific pattern. This is where you get to get creative!

photo by Jessica Y.
Beautiful tie dye cupcakes prepare to make magic in the oven.

You can leave the batter in layers, or use a toothpick to swirl the colors together. Experiment. See what happens. They all come out fabulous!
7. Place cupcakes in the oven. Bake for 20-25 minutes. Cupcakes are done when they spring back after being lightly pressed on the top.
8. Unwrap and let them blow your mind!
photo by Jessica Y.
Beautiful, delicious and tie dye. Does it get any better?